The Jira add-on allows an administrator to control some features that affect the add-on's behavior. Most configuration options are available from the add-on's Configuration screen.
- Webooks
- Realtime-Enabled Projects
- Export Sharing Default
- Issue Key Link
- Issue Export Limit
- Additional Export Tab Options
- Event Auditing
- Export Locations
- Workflow Transition Post
| Anchor | ||||
|---|---|---|---|---|
|
This section of the Configuration screen allows an administrator to toggle which Jira events will trigger updates to real-time update Google Sheetsexports. By default, only issue- and worklog-related events are enabled. Most administrators find that the default configuration meets their needs, but there are cases where you may want to enable other webhooks. For instance, if you have an export that should update when a sprint is closed, an administrator would enable the "Sprint Closed" webhook so that your export is updated when the sprint is closed. It is also possible to disable all webhooks if you need to quickly stop updates to all of your sheetsexports.


Toggle webhooks as necessary for your goals, and click the Save Configuration button to save your new selections. This change takes effect immediately for all sheetsexports.
| Anchor | ||||
|---|---|---|---|---|
|
This section allows an administrator to define which projects' Jira events will trigger updates to real-time update Google Sheetsexports. By default, every project is enabled. Administrators may find that some projects do not need to update Google Sheetsexports, and disabling those projects here may provide a performance benefit. Jira events fired from issues in projects that are not enabled here, will be ignored. Note that this section and the 430932007 2547482857 section work together; the add-on will only process enabled events on realtime-enabled projects. Users are still able to export issues from projects that are not enabled here, but changes to issues in those projects will not trigger real-time updates, even if the sheet export itself is realtime-enabled.

...
Note: This section is currently only supported in Jira Server and Data Center.
This section allows an administrator to define the default Export Sharing value for all exports created by the add-on. If this section is not configured, all exports will be viewable by any user with a link to the export by default. To change this, select a different value from the drop down menu, enter a new sharing value (if necessary), and click the Save button at the bottom of the screen.
After selecting a new sharing type:

The drop down menu and value input match what users will see on the Export screen when creating a new export.
Note: Defining a sharing default does not prevent users from changing the sharing value when they create a new export. To prevent users from changing this default when creating an export, tick the Remove from Export screen checkbox at the bottom of this section:
...
This section allows an administrator to define the hyperlink for issue keys displayed in exports. The default value is View Issue, so that clicking on an issue key in an export will take the user to that issue's View Issue screen in Jira. An administrator can choose the alternative Edit Issue option to load the Edit Issue screen in Jira, or define a custom hyperlink.

| Anchor | ||||
|---|---|---|---|---|
|
This section allows an administrator to set a limit on the number of issues that can be exported to a single sheetat one time. Since larger sheets exports take more time and resources to generate and update, limiting the number of issues in the sheets exports can help improve performance. The default limit matches your Jira instance's setting (jira.search.views.max.limit in Jira Server or Data Center, or is 1,000 in Jira Cloud). To allow an unlimited number of issues, set this value to -1. Any limit set here applies to all exports created by the add-on.


| Anchor |
|---|
...
|
...
|
...
Options
This section allows an administrator to expose additional data export options for users to select on the Export screen. If any options are enabled here, a an "Additional Export TabsData" item will appear on the Export screen, giving the user the option to export additional data to their sheet.

...
This section allows an administrator to define Google Drive folders and Google Shared Drive folders where users can store their exports. If this section is not configured, all exports will be stored your in Service Account's default location. To define which folders users may store their exports in, perform the steps below.
Create Folders
If you have not already created the folders you want to use, create them in Google Drive or a Shared Drive (formerly Team Drive). If you have already created the folders, skip to the Folder Sharing step.
Go to https://drive.google.com/ and sign in with your Google account.

Right-click on My Drive on the left (or Shared Drives, if using Shared Drives), and select New Folder.

Enter the name of your new folder and click the Create button.

Repeat this process as many times as necessary to create your folders.
...
Each folder you want to use will need to be shared with the Service Account you are using for the add-on.
...

From your list of folders, right click on each folder you would like to share, and click the Share... item.

In the Share with others dialog that appears, enter the email address associated with your Service Account. If you are not sure what this address is, it can be found in your Service Account's credentials JSON file. Do not enter your own Google account address here.

After entering your Service Account's email address, click the Send button. Repeat this process for all folders you want to use for storing exports.
Choose Export Locations
Return to the add-on's Configuration screen, and refresh the screen if necessary. In the Export Locations section, you should now see your shared folders from the previous steps, with checkboxes next to them. Locations in Shared Drives will appear beneath the Shared Drive name.

If you do not see your folders, check to ensure the folders have been shared properly with your Google Service Account's email address. It may take a couple minutes for your sharing changes to take effect.
Check the box for each folder where users should be able to store their exports, and click the Save button to save your new selections.
 other tables in the selected namespace. Currently there are 14 additional export options available, with 13 of these options being configurable by a Jira administrator. Some options, such as Tempo Worklogs, are only available when the developer's app is installed and active.
Boards, Components, Issue Types, Projects, Sprints, Users, and Versions will each perform a full export of their data into their respective tables in the selected namespace. Depending on data type and update type, other exports such as Assets will only export data that has changed since the last time an update was performed on the export. In the case of Changelogs and Worklogs, only the data that relates to the issues present in the user's export will be exported into their respective tables.
Enabling the Time in Status option will allow users to populate a table in Snowflake that summarizes the status changes performed on each issue in their export, and includes the number of minutes that the issue spent in each status.
Enabling the Tempo Worklogs option will allow users to export data related to Tempo Worklogs, including billable time, review status, and associated attributes.
Enabling the Analytics Structure option allows each export to populate a number of bridge and dimension tables within Snowflake that help to perform additional data analysis and visualization in Business Intelligence platforms such as Microsoft Power BI.
The final export option available to users, Field Mapping, is not configurable by a Jira administrator because it does not require additional API calls. Any user can export this data into the selected Snowflake namespace.
| Anchor | ||||
|---|---|---|---|---|
|
This section allows an administrator to enable additional auditing to record actions performed by the app, including which types of updates were performed by which users, which tables were updated, how much time was required to perform the updates, and whether any errors were encountered. These records are stored in the S4J_EVENT_AUDIT table in Snowflake. Additionally this will record details about any issue keys requested from Jira that either are not returned, or could not be inserted into Snowflake. These records are stored in the S4J_EVENT_AUDIT_ISSUES table in Snowflake.
| Anchor | ||||
|---|---|---|---|---|
|
This section allows an administrator to define Snowflake namespaces where users can store their exports. For each database in the list, check the checkbox for the schema(s) were you would like to allow users to create exports in that database.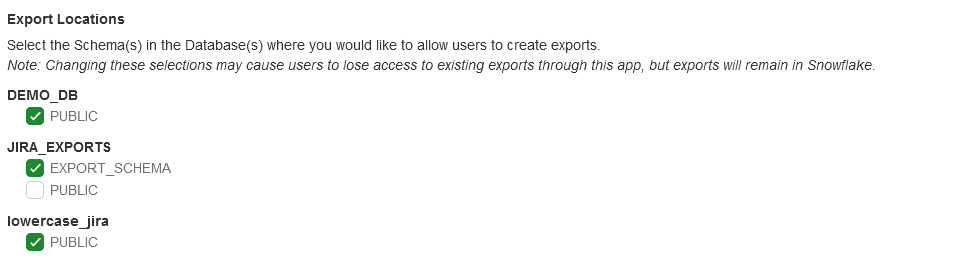
After saving your Export Locations selections, users will see a new Folder Database/Schema item on the Export screen that, when clicked, will display a folder database selection drop down with the folders databases you specified.


If a user does not pick a folder database from this drop down when creating a new export, the export will be stored in the Service Account's default locationfirst available database.
| Anchor | ||||
|---|---|---|---|---|
|
Administrators may want to trigger sheet export updates only when certain workflow transitions occur, instead of triggering updates every time an issue is created or edited. The add-on exposes a workflow transition post function to accomplish this goal. Since issue fields are typically edited during workflow transitions, we recommend you carefully consider your configuration of workflow transition post functions and how they may overlap with configured webhooks, since they present the possibility of firing multiple update events for a single change.
To configure a workflow transition that will call the post function, navigate to the workflow administration area by clicking on the Gear Icon in the top right, then selecting Issues and selecting Workflows on the left side.

Find the workflow you want to configure, and click the Edit item for that workflow.

In the workflow edit screen, find the transition you want to configure, and click the transition's name in the Transitions (id) column.

Click on the Post Functions tab for the transition, and then click Add post function.

Find the Google Sheets Snowflake Integration - Trigger Updates post function, and tick the radio button next to it, then click Add.

Click through the remaining screens as instructed. When you are finished making changes, click on the Publish Draft item at the top of the screen.

Complete the optional workflow backup steps and click Publish to finish your changes.
