The Jira add-on allows an administrator to control some features that affect the add-on's behavior. Most configuration options are available from the add-on's Configuration screen.
...
| Table of Contents |
|---|
| Anchor | ||||
|---|---|---|---|---|
|
...
This section allows an administrator to define which projects' Jira events will trigger updates to real-time update Google Sheets. By default, every project is enabled. Administrators may find that some projects do not need to update Google Sheets, and disabling those projects here may provide a performance benefit. Jira events fired from issues in projects that are not enabled here, will be ignored. Note that this section and the Webhooks 430932007 section work together; the add-on will only process enabled events on realtime-enabled projects. Users are still able to export issues from projects that are not enabled here, but changes to issues in those projects will not trigger real-time updates, even if the sheet itself is realtime-enabled.

| Anchor |
|---|
...
|
...
|
...
Options
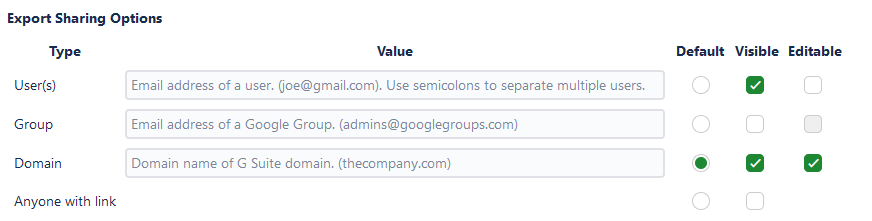
Note: This section is currently only supported in Jira Server and Data Center.This section allows an administrator to define the default Export Sharing value for all exports created by the add-onexport sharing options available to users when they export data from Jira. If this section is not configured, all exports will be viewable by any user with a link to the export by default. To change this, select a different value from tick the appropriate radio button and checkboxes to configure which options will appear in the drop down menu, enter a new sharing value (if necessary), and click the Save on the Export screen, and whether the value for each option is editable. Click the Save Configuration button at the bottom of the screen .
After selecting a new sharing type:

The drop down menu and value input match what users will see on the Export screen when creating a new export.
Note: Defining a sharing default does not prevent users from changing the sharing value when they create a new export. To prevent users from changing this default when creating an export, tick the Remove from Export screen checkbox at the bottom of this section: when you are finished. Note: The Default option will be pre-selected for the user on the Export screen, but the user can still choose another sharing option if there are other visible options. Also, the Default option will be used by the Restore Default Sharing feature on the Published Sheets screen.
| Anchor | ||||
|---|---|---|---|---|
|
...
This section allows an administrator to expose additional data export options for users to select on the Export screen. If any options are enabled here, a "Additional Export Tabs" item will appear on the Export screen, giving the user the option to export additional data to their sheet.


| Anchor | ||||
|---|---|---|---|---|
|
...
Administrators may want to trigger sheet updates only when certain workflow transitions occur, instead of triggering updates every time an issue is created or edited. The add-on exposes a workflow transition post function to accomplish this goal. Since issue fields are typically edited during workflow transitions, we recommend you carefully consider your configuration of workflow transition post functions and how they may overlap with configured webhooks, since they present the possibility of firing multiple update events for a single change.
To configure a workflow transition that will call the post function, navigate to the workflow administration area by clicking on the Gear Icon in the top right, then selecting Issues and selecting Workflows on the left side.

Find the workflow you want to configure, and click the Edit item for that workflow.

In the workflow edit screen, find the transition you want to configure, and click the transition's name in the Transitions (id) column.

Click on the Post Functions tab for the transition, and then click Add post function.

Find the Google Sheets Integration - Trigger Updates post function, and tick the radio button next to it, then click Add.

Click through the remaining screens as instructed. When you are finished making changes, click on the Publish Draft item at the top of the screen.

Complete the optional workflow backup steps and click Publish to finish your changes.
