This page will guide you through the initial setup of the Google add-on, as well as how to use it to update your Jira issues and perform other Jira tasks from Google Sheets.
| Anchor | ||||
|---|---|---|---|---|
|
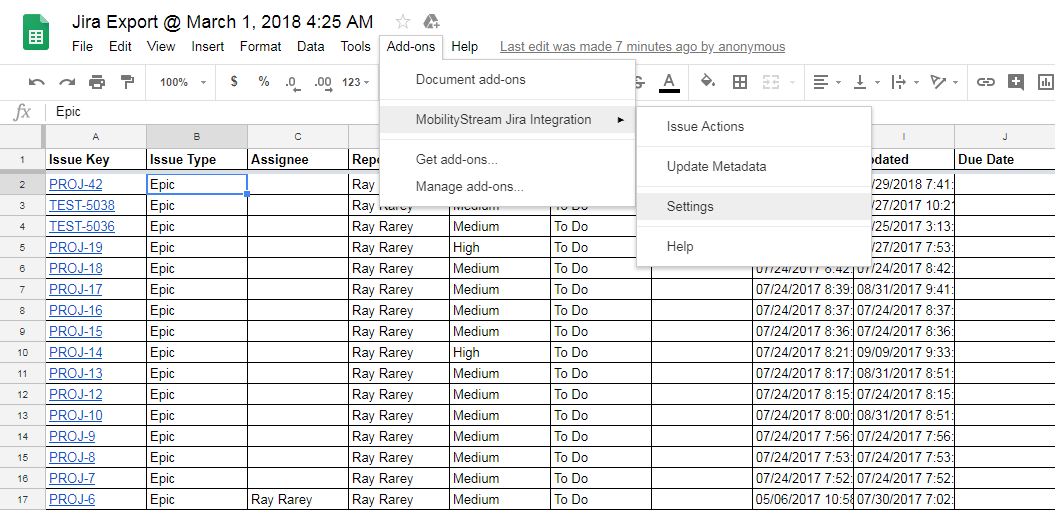
After installing the add-on, the first step is to provide your Jira server settings to the add-on. This is done through the "Settings" menu item for the add-on, located at Add-ons → MobilityStream Jira Integration → Settings.
This menu item brings up the Jira server settings dialog.
Jira Cloud users: Atlassian no longer accepts username & password-based authentication for scripts or processes accessing Jira Cloud APIs. In this You will need to create an API Token to use this add-on. Please see the Atlassian API Token documentation for API Token creation instructions. The API Token you create will be used in place of your Jira password when authenticating in the Google add-on.
In the Jira Server Settings dialog, provide your Jira instance URL, Jira username, password , and Jira URL(or API Token, for Cloud users), and press the Save button.
The add-on will attempt to connect to Jira using the information you provided, and you will be presented with either a success or failure message in the dialog.
If the add-on presents a red failure message, make sure that you have entered your username, password (or API Token, for Cloud users), and Jira URL correctly. The Jira URL should be the same URL you use to log in to your Jira instance from a web browser. If your information is correct but the add-on still cannot connect to your Jira instance, report the problem to us.
...
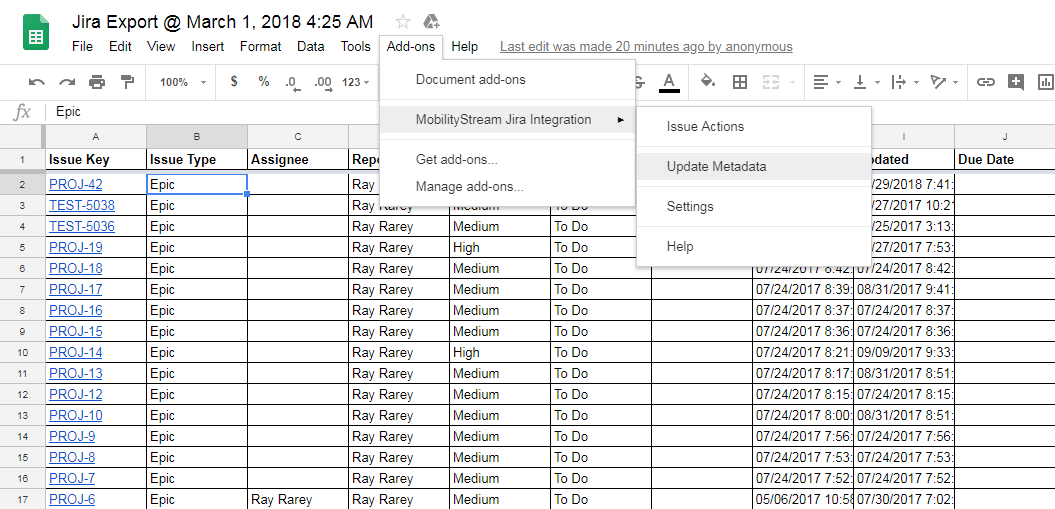
The second step to using the add-on is to update the Jira metadata stored by the add-on. Metadata should be updated occasionally to avoid issues with syncing data, and the add-on will remind you to update every 7 days. The process typically takes only a few seconds. To update the metadata, access the metadata update dialog through the "Update Metadata" menu item for the add-on, located at Add-ons → MobilityStream Jira Integration → Update Metadata
This menu item brings up the Update Metadata dialog. In this dialog, just press the Update button. The add-on will download the necessary Jira metadata, displaying a progress indicator as the process runs.
When the process is complete, the dialog will display a success message and close itself. After the metadata has been updated, you are ready to start using the add-on!
| Anchor | ||||
|---|---|---|---|---|
|
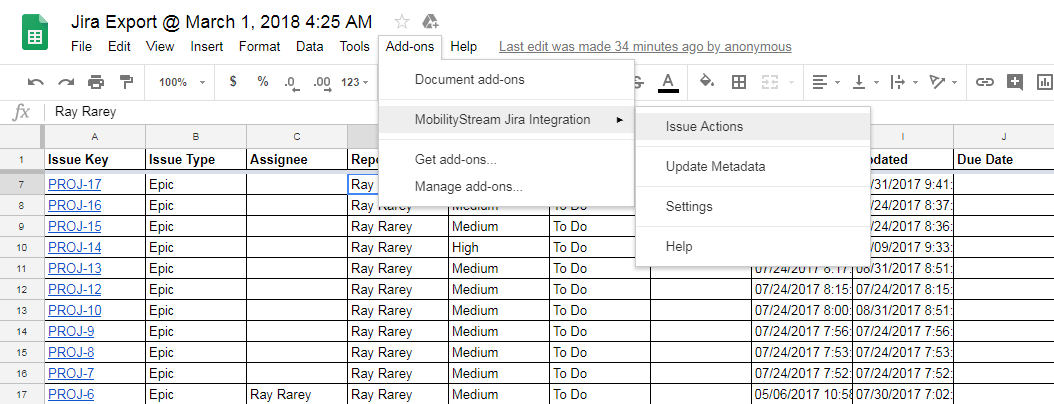
To start using the add-on to sync Google Sheets changes back to Jira, open the Issue Actions sidebar. This is done through the "Issue Actions" menu item for the add-on, located at Add-ons → MobilityStream Jira Integration → Issue Actions.
The Issue Actions sidebar must be opened every time you want to use the add-on to sync issues or access other Jira features from within Google Sheets.
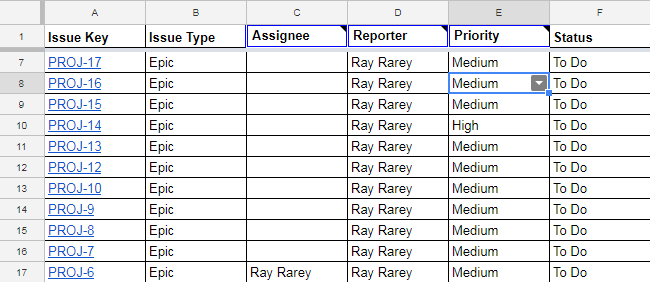
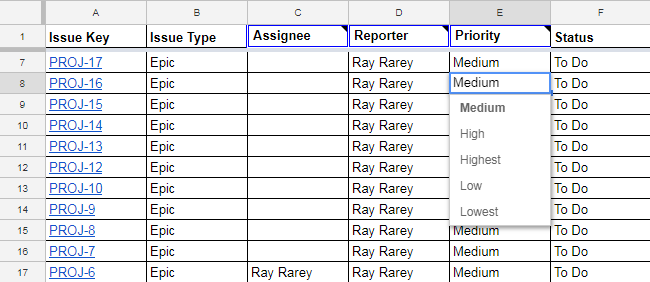
Opening the Issue Actions sidebar will update your sheet with some changes to the header row to help identify which columns in your sheet can be synced back to Jira. Fields that can be synced back to Jira will have their borders changed to blue, and a small note indicator added. The note also helps to explain that the field will sync back to Jira. For more information on the field types that can be synced from Google Sheets to Jira, see the Google Sheets Synchronization - Supported Field Types page.
| Anchor | ||||
|---|---|---|---|---|
|
With the Issue Actions sidebar open, you can start editing Jira issues, or access other Jira issue features of the add-on. Select any cell in a Jira issue row, and the Issue Actions sidebar changes to show which Jira issue you are currently focused on. The Issue Actions sidebar also provides links for other actions that can be performed on the Jira issue, such as viewing and adding comments, or editing mutli-value/search fields. For more information on the actions available in the Issue Actions sidebar, go to the Issue Actions section.
After focus is placed in a spreadsheet cell, you can change the cell's value and if it is for a field that syncs back to Jira, your change will sync back to Jira after you finish editing the cell. Certain cells that are single-select fields in Jira, such as Assignee, Reporter, and Priority, will change to single-select drop downs in Google Sheets after you place your cursor in them. This change can take up to 1 second, so please be patient and wait for the drop down indicator arrow to appear. Other cells that are multi-select or require searches, such as Labels, Affects Version, or Picker Custom Fields, will display an input field in the Issue Actions sidebar to edit the value(s).
If you place focus in a cell that is not a single-select field in Jira, such as Description, Summary, or other text fields, you can edit the value immediately.
After changing a cell value, the add-on will attempt to send your changes back to Jira, and display a success or failure toast in the bottom right of Google Sheets depending on the result.
In the case of an update failure, the toast will contain an error code and error message. The cell that failed to update in Jira will also have a red border with a note that containing the same information as the toast.
After an update failure, if you change the value of the cell to something that will allow it to update properly in Jira, the red border and note will be removed.
| Anchor | ||||
|---|---|---|---|---|
|
The Issue Actions sidebar allows you to perform other actions on Jira issues in your sheet, even if the data associated with these issues is not present in your sheet. These actions are available as links in the Issue Actions sidebar, and are described below.
| Anchor | ||||
|---|---|---|---|---|
|
To add or view comments for an issue in your sheet, click on the Comments link in the Issue Actions sidebar. This will display the Comments dialog for the issue you are currently focused on.
To add a new comment, click the blue Comment button to display the comment entry area. Enter your comment, and click the Add button.
The dialog will update with your new comment after successfully updating the Jira issue.

